
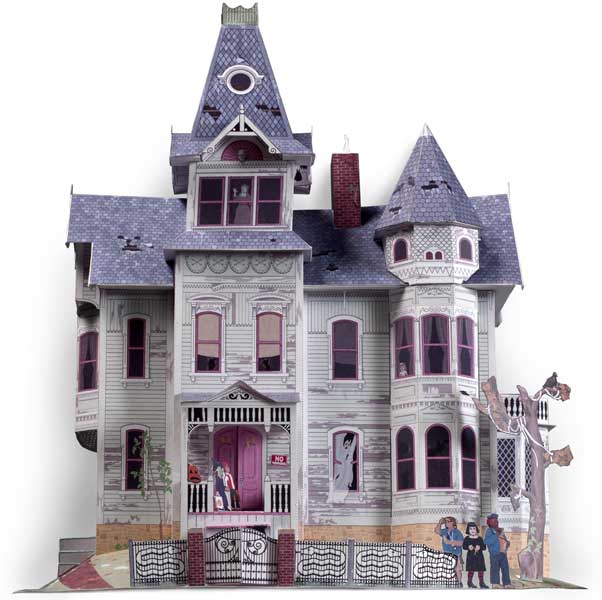
|
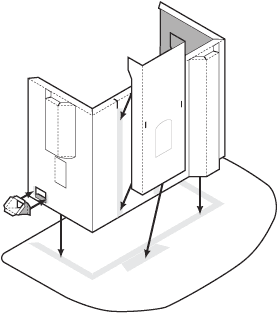
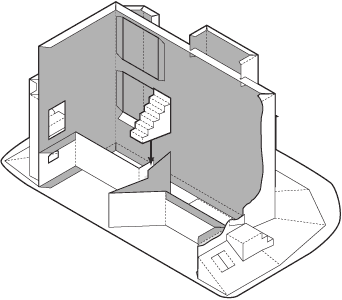
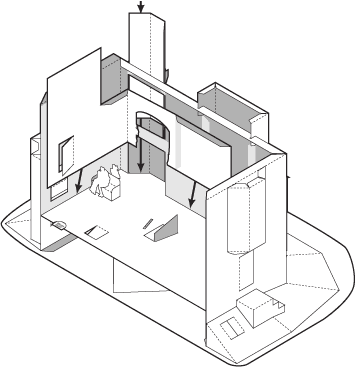
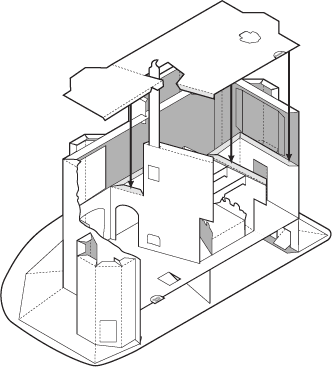
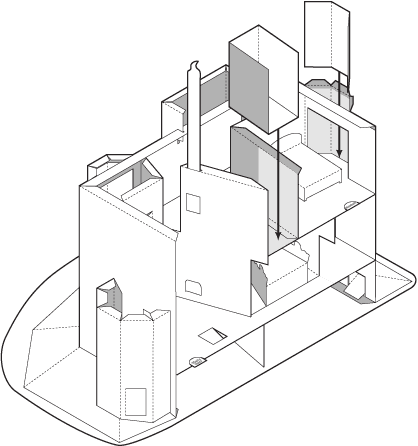
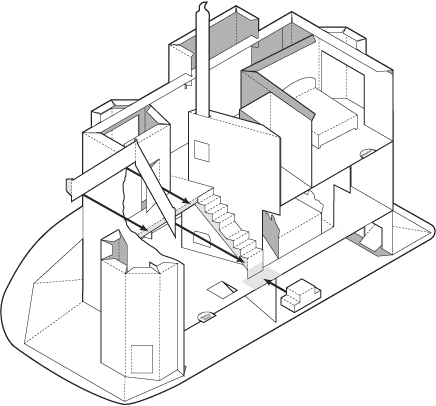
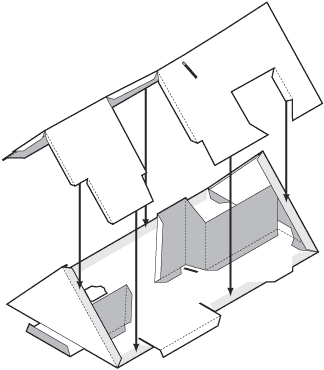
To build your model of Skorrenfold Manor, cut out the walls along the solid black outline. Score the paper on the dotted lines before folding, as explained on the inside back cover. Cut out the openings for the bay window on the front wall.
|
|
 |
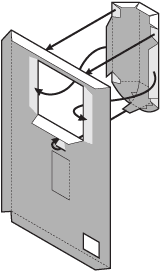 |
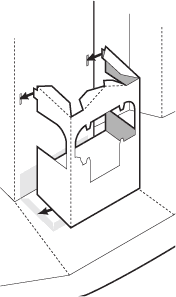
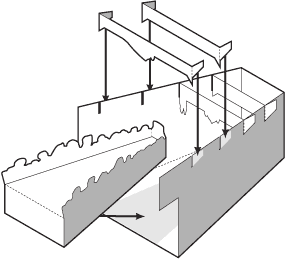
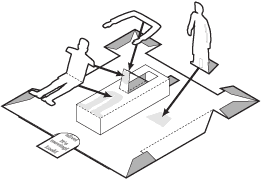
First, cut out the front and left wall pieces and bay windows. Don't forget to cut out the slots and the openings for the bay windows.
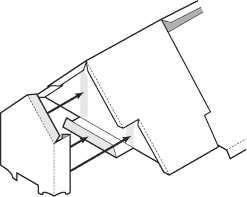
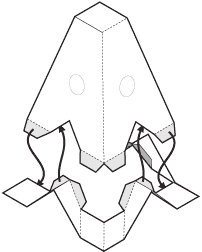
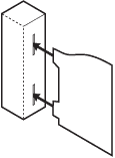
Fold the tabs of the bay and oriel windows forward or backward as marked. Curl the bottom sides of the oriel window inward and push the bottom tab through the slot on the left wall. Glue the small tabs to the front of the wall. Push the large tabs through the wall openings, fold back and glue inside the walls. |
 |
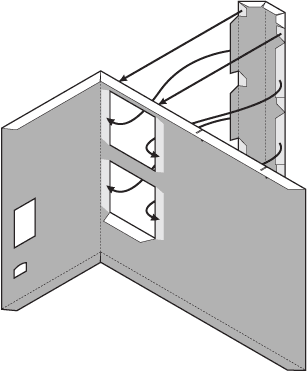 |
Glue the bay window through the opening in the front wall in a similar manner. Make sure the sides of the oriel and bay windows are snug against the edges of the opening and flush with the front of the walls. Adjust each piece to the correct position before the glue dries. |
 |
 If you are making the interior, assemble the cellar steps with the printing on the inside. If you are making the interior, assemble the cellar steps with the printing on the inside. |
|
 |
 |
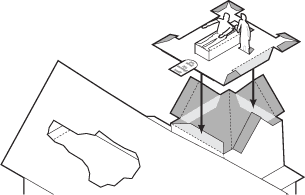
Glue the front and left walls together. Glue the front entry to the front wall with the top of the entry fitting into the slots at the top of the front wall. Then glue the walls to the house base. If you are making the interior, insert and glue the cellar steps in the opening in the left wall with the chute leading down into the basement. |
 |
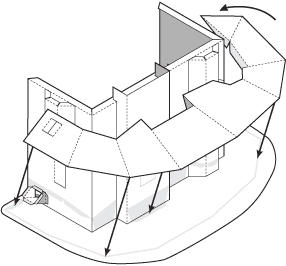 |
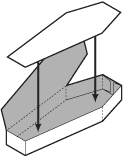
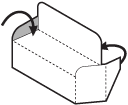
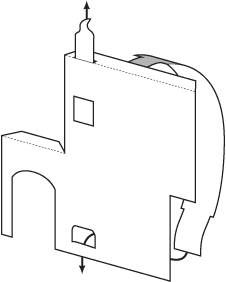
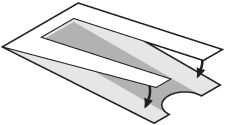
Score and cut out the hill. Cut the edges of the cellar door and score inside the hinges to open outward. Test the fit of the hill around the house first. Glue the tabs to the walls around the house and the bottom edge of the hill to the base. Set the base on a flat surface while the glue dries. You can place light weights on the bottom edge of the hill while the glue dries to ensure that the base stays flat. |
 |
 |
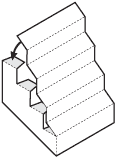
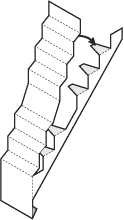
Assemble the side steps. Note the reverse (valley) folds and forward (mountain) folds. Glue in position on the side of the hill and side of house. |
 |
 |
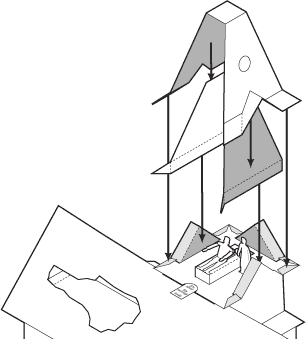
Cut out the front porch. Glue porch floor inside the porch sides, lining up the tabs at the back of the porch. |
 |
 |
Assemble the porch stairs. |
 |
 |
Insert tabs at top of porch into slots above front door and glue to the front of the house and hill. |
 |
Cut out the porch roof. Fold into shape with mountain and valley folds. Glue roof to the top of porch tabs. Glue the porch stairs in place on the hill and the front of porch. |
|
 |
 |
Cut out the sun porch exterior. Score and fold into an octagonal shape. Cut the sides of the door on the lower level of the porch exterior. Score inside the hinge to open the door.
|
 |
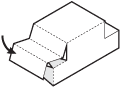
Glue the clown to the hill under the porch. Glue the porch to the hill and right wall of the house.
|
|
 |
 |
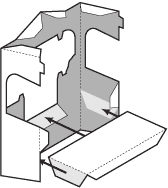
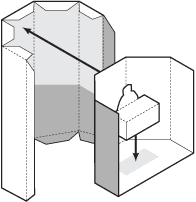
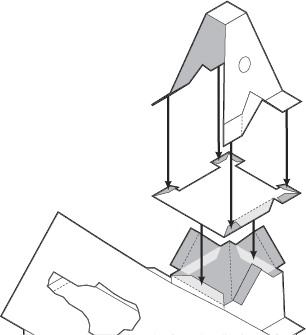
Cut out the dungeon and rec room walls and fold forward or back as indicated by mountain- and valley-fold lines. Glue the side walls to the back of the exterior and the bottom tabs to the base in the marked places. |
 |
Assemble the basement stairs and glue in place between the two basement walls. |
|
 |
Assemble the coffin and place the vampire inside. Drop the coffin down through the cellar doors into the basement. Cut out the first floor. Score and fold the tabs down. Cut along the edge of the trap door and score the hinge so that the trap door can open downwards. Do not glue the floor in place yet. |
|
 |
 |
|
 |
Bend the teenagers into a sitting position and glue in place on the left side of the couch.
|
|
 |
|
|
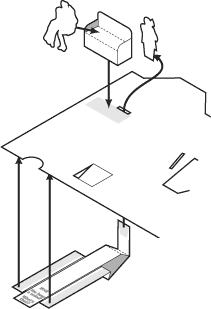 |
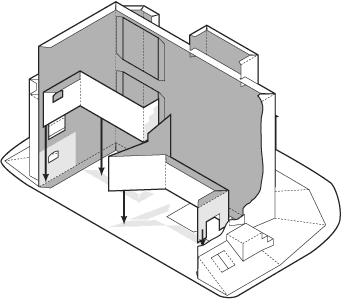
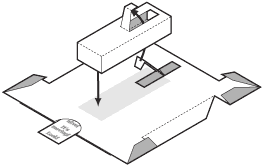
Push the middle tab up through the slot behind the couch and glue the side strips of the guide underneath the floor, being careful not to glue the sliding tab. Line up the half-circle on the guide with the half-circle on the floor. Wait until the glue is dry before adding the couch. Glue the couch in place with the teenagers sitting on the left. Glue the ax murderer to the pop-up tab so that he is hidden just below the back of the couch when the tab is down. |
|
 |
 |
Glue the first floor in place to the top tabs of the basement walls. Fit the upper part of the basement wall near the stairs up through the hole in the floor. |
 |
Cut and fold the bay window interior and slide down into the bay flush to meet the floor. Cut out the left drawing room interior wall. Score the folds on the reverse side of the paper to fold forward. Cut the edges of the secret door in the bookcase and fold forward. Glue the back panel of the secret door behind, with the book sticking out as a handle to open the door. Glue the drawing room left wall snugly into the corner of the living room with the bottom edge flush with the floor. |
|
 |
 |
|
 |
 |
Glue the kitchen door to the back of the side door on the left exterior wall. Cut out the kitchen walls. Fold the walls and top tabs inwards. Glue the kitchen walls to the floor and the back of the left exterior wall. |
 |
 |
Assemble the dinner table. Glue the dinner guests around the sides and back of the table facing inward. |
 |
 |
Fold the dining room walls inward and glue the tabs behind the back wall with the printed side facing inward. Glue the dinner table in place to the floor. Insert the rafters into the slots and glue the tabs to the back side of the dining room walls. |
 |
 |
|
 |
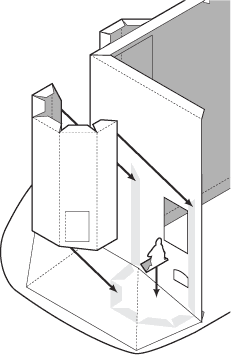
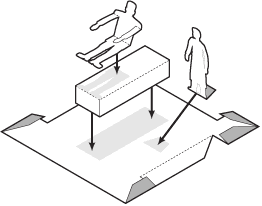
Glue the words end of the monster under the bed piece back-to-back, but do not glue the monster end. |
|
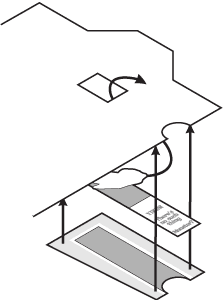 |
Fit the monster's body up through the hole in the floor. Glue the guide under the floor carefully so that the pulltab can slide freely in the guide track. Line up the circular end of the guide with the circular edge of the floor. | |
 |
 |
Fit the upstairs floor carefully around the tall drawing room wall. Glue the floor to the top tabs of the first floor walls. |
 |
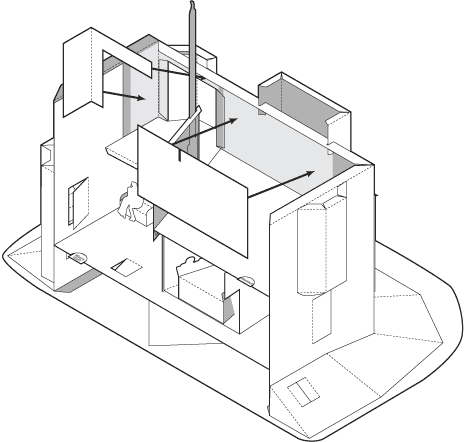 |
Glue the nursery interior into the corner of the right and front walls, tucked under the top tabs. Then glue the hallway piece behind the front wall. |
 |
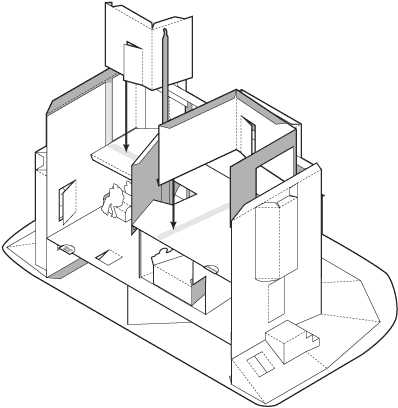 |
Cut out the nursery exterior and bedroom walls. Cut around the edges of the nursery door and back door of the bedroom. Score the hinges to open the doors. Fold and glue the nursery exterior wall in place to the floor and side walls. Fold and glue the bedroom walls in place to the floor. |
 |
Assemble the bed and glue in place on the bedroom floor, being careful not to put glue on the tab at the foot of the bed so that the monster under the bed can slide freely back and forth. |
|
 |
 |
Assemble the bathroom into a box, then glue it to the floor and back of the bedroom wall. Slide the oriel window interior down behind oriel window to meet the floor in a similar way to the bay window interior in step 12 previously. |
 |
 |
Assemble the staircase. |
 |
 |
Assemble the landing for the base of the stairs. |
 |
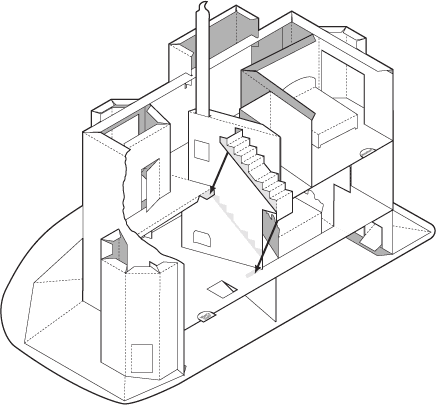 |
Glue the staircase in place to the balcony tab, drawing room wall and the drawing room floor. |
 |
Glue the landing in place at the base of the stairs. Cut out the balustrade. Glue to the balcony tab and side of the staircase. |
|
 |
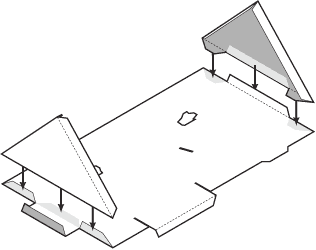 |
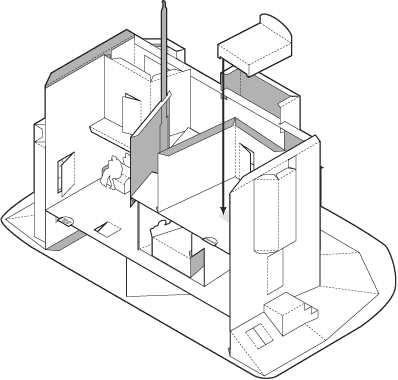
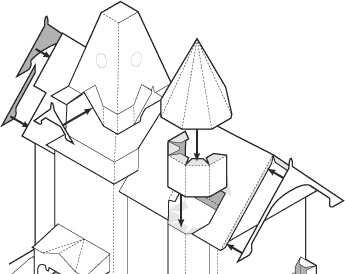
Cut out the left and right gables and attic floor. Note the direction of mountain and valley folds. Don't forget to cut out the holes in the floor, and if you are adding the fireplace ghost from Step 13, cut open the slot in the attic floor. Glue the left and right gables to the ends of the attic floor. |
 |
 |
Score and fold the front and back roof pieces. Glue the small tabs together to join the pieces at the ridgeline. |
 |
 |
|
 |
Glue the outer roof tabs to the attic floor and top of the gables. Place the roof on a flat surface before the glue sets to make sure it does not dry warped or crooked. | |
 |
 |
Cut and fold the oriel attic. Glue underneath the roof and to the the left gable. |
 |
 |
Glue the attic to the top of the walls.
|
 |
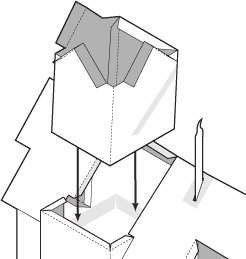 |
Assemble the belvedere. Note the reverse (valley) folds at the top of the belvedere. Glue in place to the floor of the attic and inside the roof. |
 |
Assemble the the pent roof and glue to the top of the front entry wall around the sides of the belvedere. Cut out the chimney.
Glue the chimney to the rooftop. |
|
 |
 |
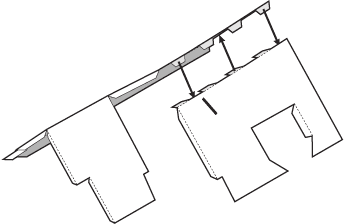
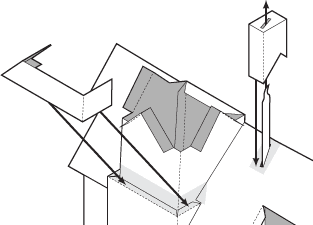
Assemble the belvedere roof with tabs folded outward. Score and cut out the eaves. Note the reverse folded tabs. Fold the eaves with back and forth folds to match the bottom edge of the belvedere roof as shown. Match the tabs of the roof and eaves and glue together. |
 |
 |
Glue the laboratory floor to the top of the belevedere and then the belvedere rooftop to the inward tabs of the laboratory floor. If you are only building the exterior, skip ahead to Step 34. |
 |
Fold the monster into a sitting position and glue to the gurney. Glue the scientist beside the monster. |
|
 |
Place the pull-tab in the track of the guide and the small end of the pull-tab up through the slot in the floor. Glue the sides of the guide under the lab floor, making sure that no glue touches the pull-tab so that it slides freely. |
|
 |
Assemble the gurney into a box and fold up the tab on the back. Adjust the pull-tab position so that the small end fits under the gurney tab and glue together. |
|
 |
After this dries, glue the arms to the flat top of the upright gurney tab. Score and fold the monster at the waist. Cut off the arms of the monster below the shoulder. Glue the legs to the bed of the gurney and trunk to the upright gurney tab, taking care not to glue the tab hinge. Glue the scientist beside the monster. |
|
 |
 |
Glue the laboratory floor to the top of the belevedere. |
 |
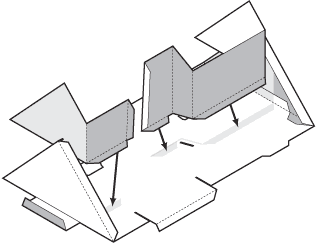
Glue the laboratory interior walls inside the belvedere rooftop, and then glue the eaves of the belvedere rooftop to the inward tabs of the laboratory floor. |
|
 |
 |
Add the bargeboards to the tabs on the ends of the roof. Glue the three smaller bargeboards to the edge of the tower eaves. Glue the small tower walls in the roof opening, then add the small tower roof on top. |
 |
 |
Assemble the gate posts. Glue the two gates in the slots of each post. |
 |
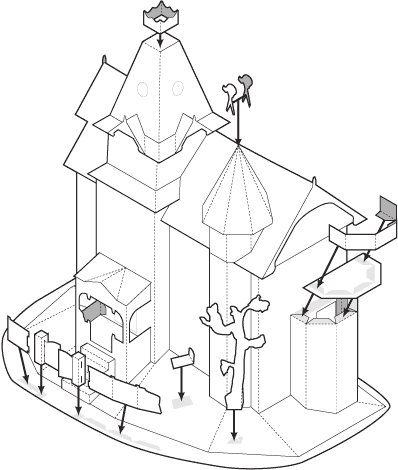 |
After the gate posts are dry, glue the posts on each side of the sidewalk. Then add the ends of the fence on each side. Glue the roof to the top of the sun porch walls and then the parapet railing on top of the roof. Add the optional decorative cresting and the weathervane. Finally, add the tree and grave to the front yard. At last your model of the Skorrenfold Manor haunted house is finished! Add dry ice and spooky sound effects to complete the eerie scene. |
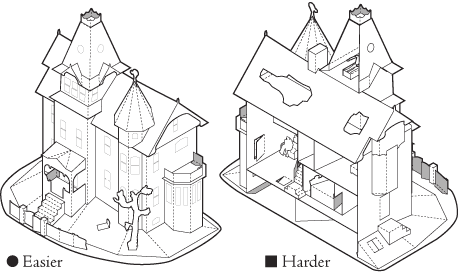
 For a simpler project, those who are afraid to enter the haunted house can make the exterior alone. Cut out the windows and glue tissue paper behind, then put a flickering led candle inside the house for a spooky effect.
 For a truly devilish challenge, there are optional pop-up monsters and surprises to add spine-tingling action to your haunted house. BOO!
 Order the Haunted House model book
Dover Publications, 2018: ISBN 978-0-486-82397-3. Paper model ©Matt Bergstrom, Wurlington Press