 |
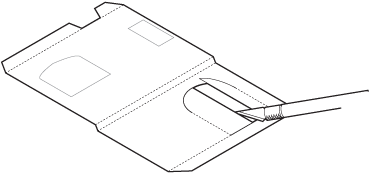
Start your model of Santa's Workshop by cutting out the four walls along the solid black line. Score the paper on the dotted lines before folding, as explained on the inside back cover. Don't forget to cut out the two slots in the front wall where the round tower will go.
For the simpler model, skip cutting out the openings in the front and side walls, but do cut out the slots for the tower with a hobby knife.
|
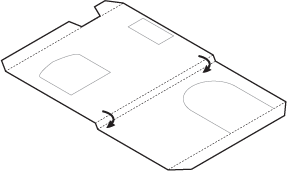 |
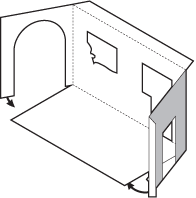
To start either the simpler or more complex versions of the workshop, first cut out the two side walls and fold into shape. Note the small overhang made by reverse folds marked with the small triangles, as explained inside the back cover of the book. |
 |
|
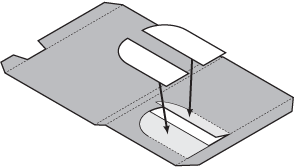 |
Score the hinges on the back of the paper to open the doors outward. Then glue an inside panel to each door. |
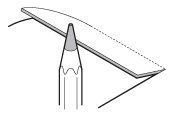 |
You can color the sides of the doors with a brown colored pencil to hide the white edges of the paper. |
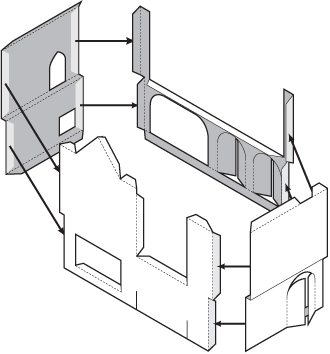 |
Cut out the back wall. Again cut open the doors if you wish. If you are adding the interior of the Workshop, save the back wall top for later. Cut out the pine tree and roll it against a round pencil or dowel into a cone shape. Set the pine tree aside for later. Glue the four walls together. |
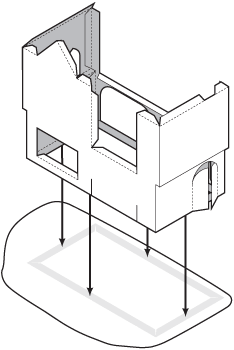 |
Next, glue the walls to the workshop base. |
 |
If you are building only the exterior of Santa's Workshop, you can skip ahead to the workshop floor and front bay pieces. To start building the interior, score and cut out the reindeer stable and coal room. Remember to score the reverse folds on the back of the paper. Fold and glue the tabs under the stable floor. Score and fold the reverse folds of the coal room also. |
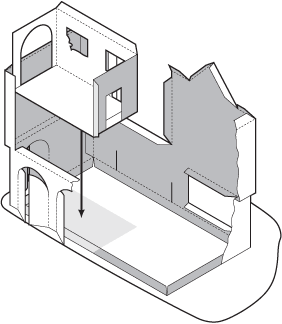 |
Glue the reindeer stable inside the corner of the building. Match up the arched doorway on the interior with the side door on the exterior as shown in the cutaway diagram. Glue the tab on right side of the stable to the inside of the column between the stable and warehouse. |
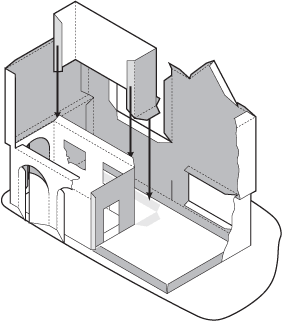 |
Then glue the coal room in place behind the stable. |
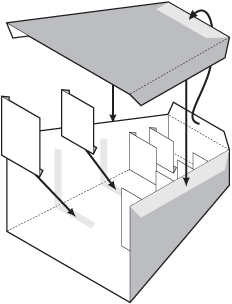 |
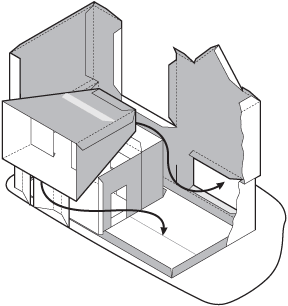
Score the reverse folds of the warehouse ceiling and warehouse (on the next page). Assemble the walls of the warehouse as shown in the diagram to the left. Glue the eight shelf pieces into place along each wall of the warehouse, lined up from largest to smallest. Then glue the warehouse ceiling in place with the tabs on the outside. |
 |
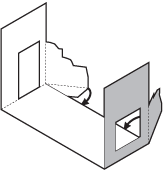
Slip the warehouse inside the outer walls of the workshop with the narrow end sticking out through the front wall and the wide end matched with the line on the base of the workshop. Test the fit first, then glue in place to the top and bottom tabs on the front wall. |
 |
Fold the reverse folds of the Shipping Department and glue the tabs underneath. |
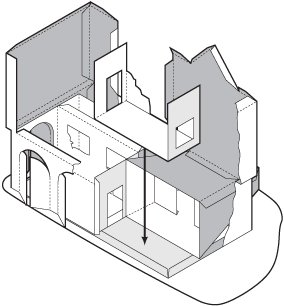 |
Slide the shipping department down inside the walls. Glue in place to the floor, the back of the reindeer stable wall on the left and the inside wall of the workshop on the right. |
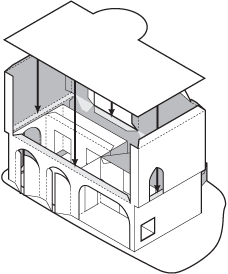 |
Whether you are building the full interior or only the exterior, add the workshop floor on this page. Cut out the floor and fold the tabs down. Slip the floor inside the workshop walls as shown in the diagram. Test the fit of the piece before gluing in place. Spread a small amount of glue on the floor tabs, the tabs on the front and back walls, at the top of the reindeer stable, and the horizontal strips of the left and right walls. |
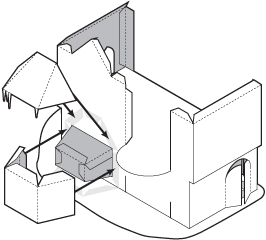 |
Next, cut out the front bay and the bay roof. Glue the front bay to the front of the house and base. Then glue the roof to the top of the front bay |
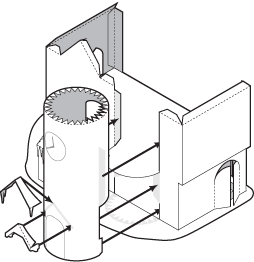 |
Cut out the round tower. If you'd like to add the optional door overhang, cut out the two slots by the door. Bend the tower against a round pencil to curl evenly into a smooth cylinder. Glue the tower into place against the front wall. Insert the tabs at the bottom into the slots on the front wall and glue the top of the tower into the front wall opening.
Insert the beam ends into the slots beside the tower door and glue just the edge of the tabs to the tower, then add the roof on top. |
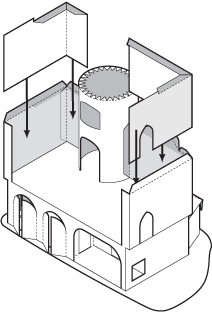 |
If you are building the interior of the workshop, cut out the two second floor interior walls. Glue the two walls into the corners of the main workshop, making sure they are straight and aligned flush with the workshop floor. |
 |
Cut out the three pieces of the fireplace. Assemble the firebox, then place inside the chimney. Next, glue the mantel piece over the front and sides of the fireplace carefully. |
 |
Curl the wall of the DJ podium into a round shape and glue the top down. |
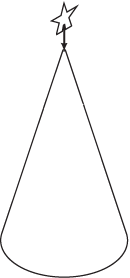 |
Roll the Christmas tree into a cone shape and glue the tab inside. Fold the star back-to-back and glue it on top of the tree. |
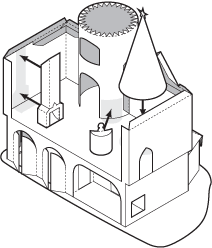 |
Glue the fireplace, DJ podium and Christmas tree in place on the second floor of the workshop. |
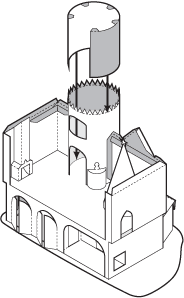 |
Cut out the kitchen wall and roll against a round pencil to make a smooth cylinder with the picture on the inside. Glue the kitchen inside the round tower. Push the kitchen wall down so that the bottom edge is straight and flush with the floor. |
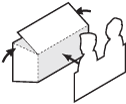 |
Assemble the small drafting table and glue the artists to the front. Set the drafting table aside for later to glue it in place. |
 |
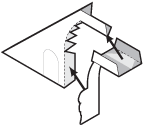
Cut out the stair railing and glue the top end back on itself as in the diagram. |
 |
Cut out and assemble the staircase. Bend the under stair to match the curve and glue underneath. |
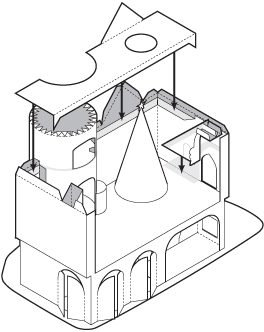 |
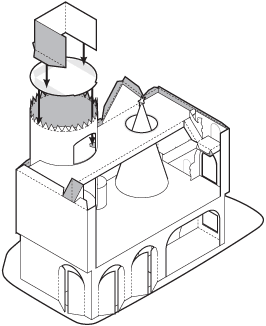
Glue the staircase to the wall and floor. Then glue the balcony to the tabs at the tops of the interior walls and inside the front wall, with the Christmas tree in the center of the cut-out circle. |
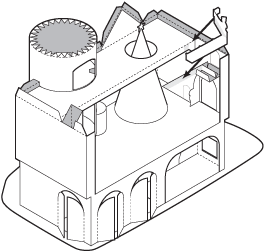 |
Glue the stair railing to the side of the staircase and the edge of the balcony. |
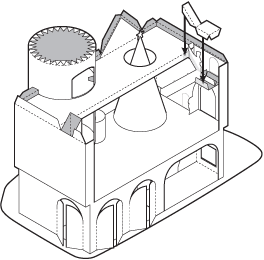 |
Glue the landing to the top of the stairs, the side of the stair railing and the balcony. |
 |
Insert the break room floor inside the round tower and glue to the tabs at the top of the kitchen wall. Then glue the break room walls to the floor inside the tower. |
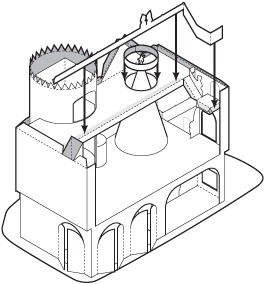 |
Glue the railing to the edge of the balcony and side of the landing. Then glue the circle railing to the floor around the opening for the Christmas tree. |
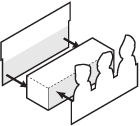 |
Assemble the design station. Glue the computer screens to the back and the designers to the front. Set the design table aside for later. |
 |
If you are building the interior of the workshop, cut out the toy testing and gift wrap departments. Don't forget to cut out the square hole in the floor. Glue the tabs under the floors to create rooms with the printing inside. Assemble the gift wrap table and add the elves behind the table. Then glue the table in place to the floor. |
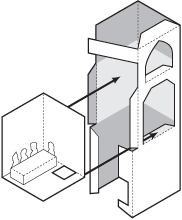 |
Cut out the square tower and fold into shape. If you are building the workshop interior, cut out the two openings in the side of the tower. If you are building only the exterior, skip ahead to the office. Glue the gift wrap room inside the walls of the square tower. Line up the floor of the gift wrap room squarely on the tab of the lower opening on the right in the diagram and aligned to the bottom of the tab on the left. |
 |
Add the toy testing room inside the top of the square tower. Again, line up the floor of the toy testing room squarely on the tab of the upper opening on the right in the diagram and aligned to the edges of the tower wall on the left. Then fold the outer wall of the tower and glue to the outside of the toy testing room wall. |
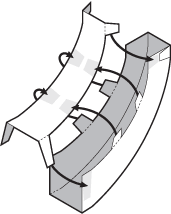 |
Curl the top and bottom of the electric slide to match the curved shape of the sides. Glue the tabs on the outside to assemble. |
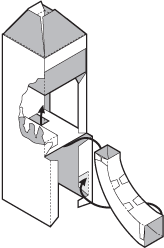 |
Slip the smaller end of the electric slide up through the gift wrap floor so that it sticks up through the floor about 1/4 inch. Then glue the side of the slide to the tab on the first level of the tower. |
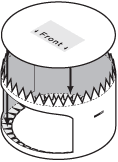 |
Cut out the exterior wall and floor of the office. If you are adding the interior details, make sure to cut out the slot in the mailbox. Curl the walls against a round pencil to make a smooth even cylinder. Fold the bottom tabs inward and glue the floor inside. Line up the arrows on the floor with the opening in the wall. If you are only building the exterior, skip ahead to the main roof. |
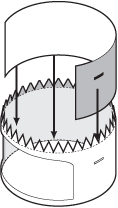 |
Next cut out the interior wall. Cut out the slot for the Inbox. Curl the piece into a cylinder then glue inside the exterior walls flush against the office floor. Line up the Inbox with the mailbox slot. |
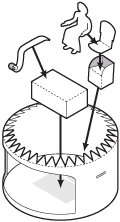 |
Assemble the desk and chair as shown in the diagram. Bend Mrs. Claus into a sitting position to fit the chair, then glue all in place to the office floor. Curl and bend the list to fit the shape of the desk and glue in place. |
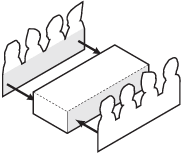 |
Assemble the three workbenches with elves on the front and back. |
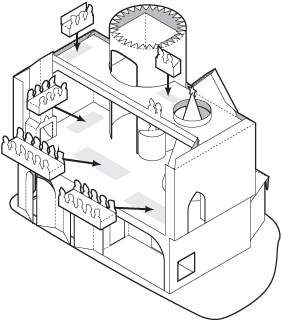 |
Glue the three workbenches in place on the workshop floor. Glue the drafting table and computer design station from earlier in place on the balcony. |
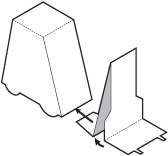 |
Cut out the simple mast for lifting packages. Note the reverse folds at each end. Glue the tall part of the mast back-to-back. Then glue the tab under the cab. |
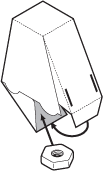 |
Glue a counterweight such as a small bolt or nut inside the floor of the cab when assembling so that the forklift can lift heavy packages without tipping over. Secure the weight with super glue or tape inside the floor. |
 |
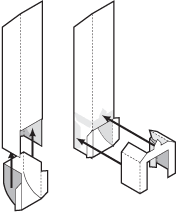
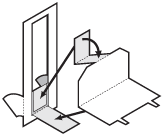
Cut out the movable mast and fold the tabs inward. Assemble the carriage as shown in the diagram with the top tab glued down to the back and the bottom part facing forward in an L shape. Slide the carriage behind the side tabs of the mast. Push the L part of the carriage through the mast opening, then fold the mast down and glue back-to-back. Glue sparingly on the side tabs of the mast only and make sure the carriage can slide up and down freely. |
 |
Fold the forks piece and glue the long tab back-to-back behind as shown in the diagram. When this is dry, glue the forks into the L shape of the carriage being careful not to get glue on the sides of the mast. After the glue dries, make sure the carriage can slide freely up and down the mast. |
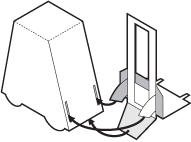 |
Finally, insert the guides on the sides of the mast into the slots and glue the bottom tab of the mast under the forklift cab. If the slots are too wide to provide friction to hold the mast in position, you can glue a scrap of paper to the back side of each guide to make it thicker. |
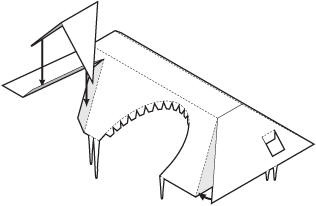 |
Cut out the main roof, fold and glue the tabs underneath. Fold the icicles down. If you are making the interior of the workshop, don't forget to cut out the opening for the chimney and fold the tab down. Glue the dormer roof to the reverse-folded tabs.
|
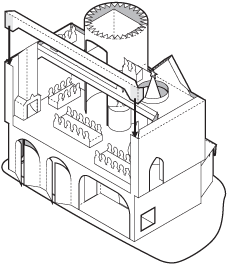 |
Find the back wall top which was set aside earlier and glue it inside the top of the back wall. Line up the top of the back wall with the top of the side walls. |
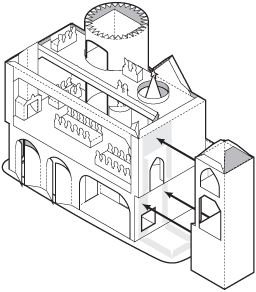 |
Attach the square tower to the side of the building. Push the bottom end of the electric slide through the square hole in the warehouse wall. |
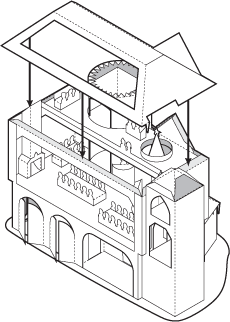 |
Test to make sure the main roof fits and then glue it in place on top of the walls carefully. |
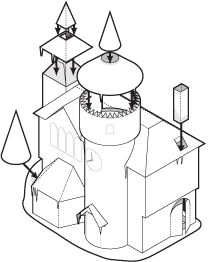 |
Finally, glue the roofs to the towers and then add the roof spires. Add the pine tree to the base. Glue the chimney to the rooftop. The closed chimney is simply glued to the top of the roof. The open chimney is fitted through the hole in the roof and should line up inside the fireplace chimney. Drop a few gift boxes down the chimney to test the alignment before the glue dries. |
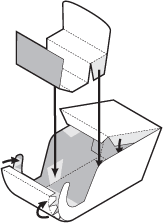 |
To make Santa's sleigh, fold the seat by forward and reverse folds into the shape shown in the diagram. Assemble the sleigh body by curling the front and gluing the tabs inside, then folding the back down and gluing inside. Add the seat inside the sleigh. Glue the floorboard to the bottom and position the curved top of the seat so that it sticks up a little above the flat back of the sleigh. |
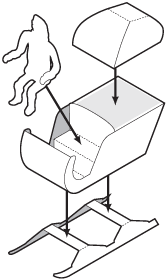 |
Add the runners and toy sack to the sleigh. Bend Santa into a sitting position to match the shape of the seat. You can glue him in place, or just seat him temporarily. |
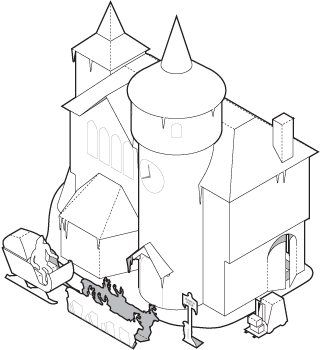 |
Line up the reindeer in front and now Santa is ready to fly off to deliver presents around the world! |
 Order the Santa's Workshop model book
Dover Publications, 2017: ISBN 978-0-486-81474-2. Paper model ©Matt Bergstrom, Wurlington Press

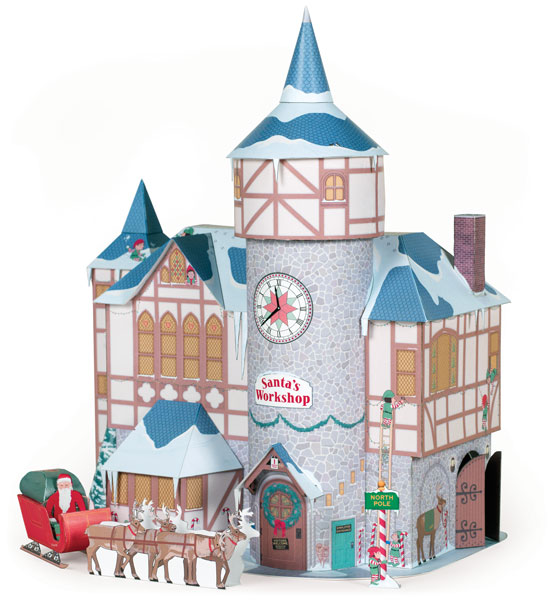
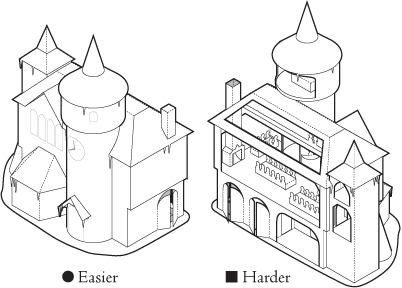
 For a simpler project that could be finished in a few hours, you can build only the exterior of the building.
  For a more-challenging project that may take several evenings, you can add all the details of the interior, and extra pieces such as Santa's sleigh and a forklift for stacking gifts in the warehouse.