 |
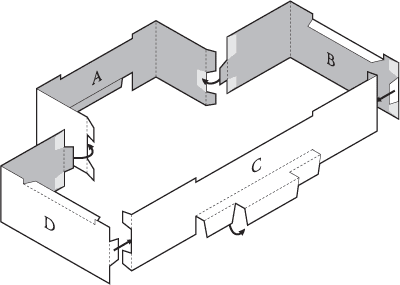
Start your Capitol model with the four walls of the center section. Score the �dotted lines lightly with a knife, as explained inside the back cover of the book.
Mark the reverse folds at the little triangles and score on the back side of the paper.
Cut out the walls A to D on the heavy outlines. On the east and west walls A&C, fold the floors of the porticoes forward and the large tabs downward.
Glue the walls together at the corners as shown in the diagram. |
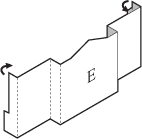 |
Cut out the east and west porticoes and fold into shape. |
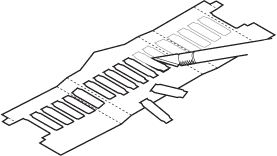 |
If you have the time and ambition, you �can make a more-detailed model by cutting out the spaces between the portico columns. Be aware that the Capitol has many columns!
Score and fold the porticoes first, then flatten again to cut out the openings between columns. |
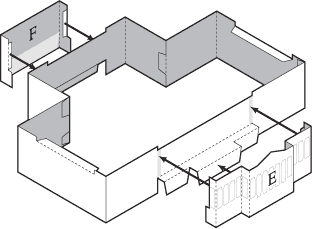 |
Once the porticoes E and F are ready, glue to the east and west walls A&C. Tuck the bottom tabs into the walls under the portico floor. Glue the sides of the porticoes to the large walls. |
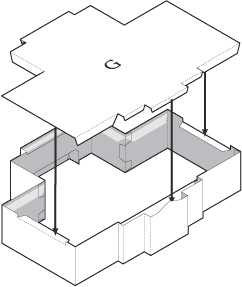 |
Cut out the central roof G and fold the tabs down. Tuck the tabs behind the porticoes and glue inside the walls, as shown in the diagram below. |
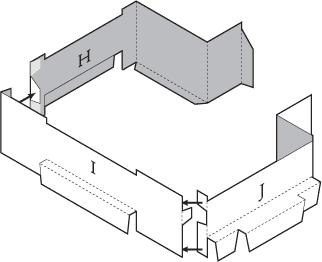 |
Score the fold lines on the walls H, I & J of the House wing. Score the reverse folds for the three porticoes on the back of the paper.
Fold the porticoes outward and glue the walls together. |
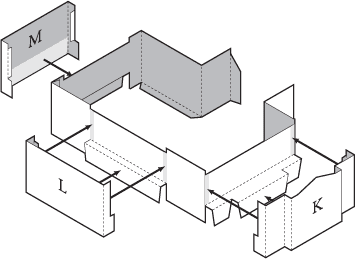 |
Cut out and fold the porticoes K to M. If you'd like, you can cut out the spaces between the columns for a more detailed model, in the same way as with the porticoes E & F.
Add the porticoes in the same way as the center section. |
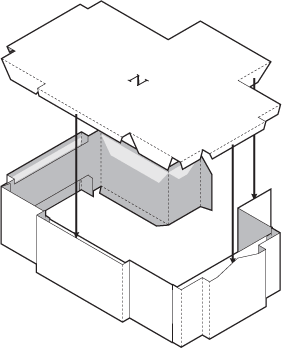 |
Add the House roof N in the same way as the center section. |
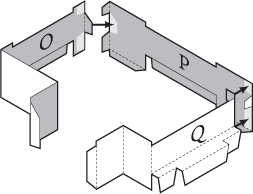 |
Score the fold lines on the walls O, P & Q of the Senate wing. Score the reverse folds for the three porticoes on the back of the paper.
Fold the porticoes outward and glue the walls together. |
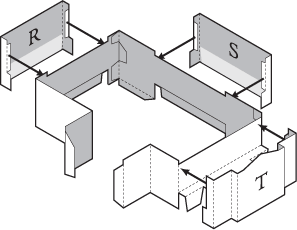 |
Cut out and fold the porticoes R to T. If you'd like, you can cut out the spaces between the columns for a more detailed model, in the same way as with the porticoes E & F.
Add the porticoes in the same way as the center section. |
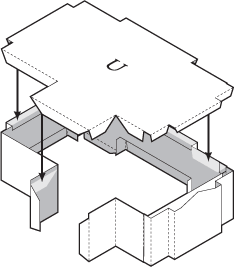 |
Add the Senate roof U in the same way as the center section. |
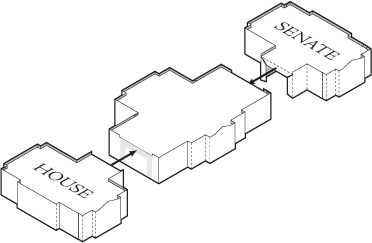 |
Glue the two wings to the center section, matching the lettered tabs. |
 |
If you'd like more detail to your model, you can add the optional small domes and rooftops.
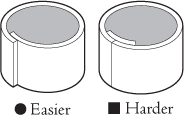
For these domes, as well as the small lanterns or cupolas and other curved pieces, you can make a smoother piece by cutting off the tab and gluing it inside the cylinder or cone to attach the edges in a flush seam. |
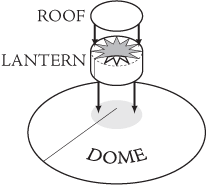 |
Curl the two dome pieces into shallow cones. Then glue the cylindrical lantern to the center and the small roof to the top of the lantern. Align the seams of the pieces when gluing together. |
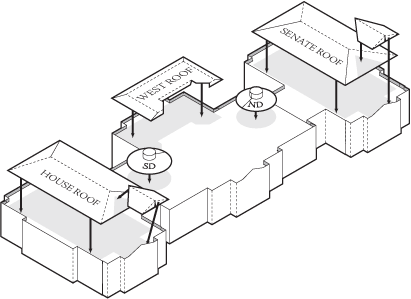 |
Assemble the three optional rooftops and glue into place. Add the dormer roofs on the east end of the Senate roof and House roof.
Glue the South Dome and North Dome in place. |
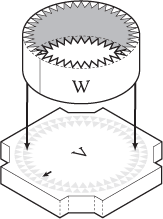 |
Cut out and assemble the stylobate V base of the dome. Next cut out the inner drum W and roll into a cylinder. Again, if you'd like to make a smoother cylinder you can cut off the end tab and glue it inside the seam of the cylinder, as shown on a previous page.
Glue the inner drum to the base, lining up the seam with the arrow marked on the base. |
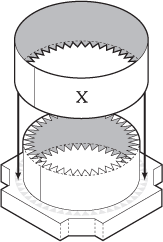 |
Cut out the outer drum X and roll into a cylinder. If you'd like to add more detail to the model, you can cut out the spaces between the columns, as you did with the columns of the porticoes. |
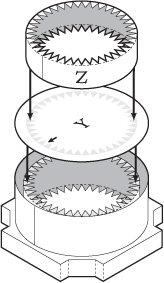 |
Glue the drum top Y to the top of the inner drum, fitting inside the top of the outer drum. Line up the arrow with the drum seam.
Cut out the attic Z. Roll into a cylinder and glue to the drum top, lining up the seams of all the cylinders. |
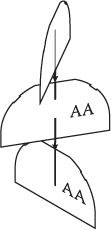 |
Cut out the three dome supports AA and slide the slots together. |
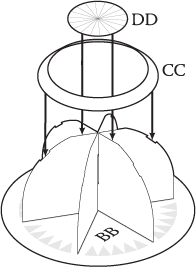 |
Glue the supports to lines in the center of the attic top BB.
Cut out the dome support ring CC and roll into an angled circle. Glue the ring to the dome supports with a little glue on the edge of the supports.
Glue the dome center DD to the top of the dome supports. |
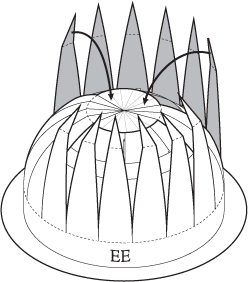 |
Next, cut out the dome EE. Curl the triangular dome sections against a round pencil slightly before assembling into a circle.
Glue the dome to the attic top, lining up the tabs as marked on top BB.
Spread a thin layer of glue on the support ring and the dome center. Fold the dome sections down one by one and attach the tips to the dome center. Once all sections are in place, press down on the top of the dome until the glue sets. |
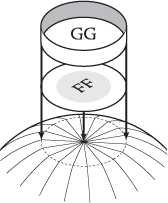 |
Glue the balustrade base FF to the top of the dome, and then the circular balustrade GG around it. Again, you can make a smoother seam on the balustrade by cutting off the tab and gluing it behind the ends of the cylinder. |
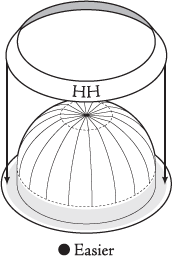 |
The consoles, or decorative supports, at the base of the dome HH can be added as a simple circular ring HH. |
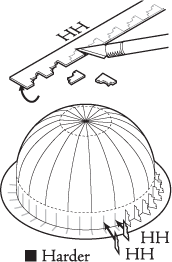 |
Or if you'd like more detail, , you can cut out the 36 individual console pieces. Cut out the rectangles around the consoles, score and fold. Glue the two halves of the rectangle back-to-back. After the glue dries, cut out each console carefully with a sharp knife. |
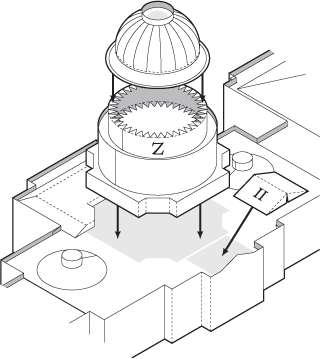 |
After adding the consoles, glue the dome to the attic Z. Line up the windows on top with the ones below.
Then glue the stylobate to the Capitol roof and add the optional east roof II behind the central pediment. |
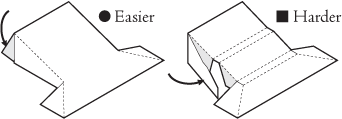 |
You can choose to cut out the three simpler staircases, or the more-detailed staircases with folded landings. Note the forward and reverse folds of the detailed staircases. |
 |
Cut out the six cheekblocks. Fold and assemble each. |
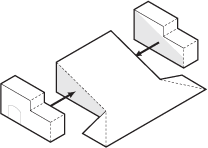 |
Glue the cheekblocks to the right and left sides of the three staircases. |
 |
For a simpler top of the Capitol, cut out the tholos JJ, roll into a cylinder and add the top KK.
Fold the Freedom statue LL in half and glue on edge to the top of the tholos. Let the glue dry thoroughly before the next step, so your Freedom statue does not topple over. |
 |
For a more detailed top, you can cut out the spaces between the columns of the tholos. Then, roll the tholos into a cylinder and add the top KK.
Assemble the inner tholos MM, floor NN and support OO. |
 |
Glue the inner tholos assembly from the last step inside the tholos JJ. Line up the windows of the inner tholos between the columns.
Next, assemble the base of the statue RR and glue on top of the tholos. Roll the globe QQ into a cylinder and glue to the top of base RR. For added realism, you could substitute a round sphere instead of the cylinder QQ.
Finally glue the two sides of the Freedom statue PP back to back and glue to the top of the globe. |
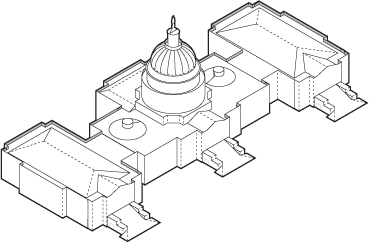 |
Last of all, glue the completed tholos in place at the top of the dome.
Then add the three staircases to the eastern porticoes of each wing. Weight the bottom of the staircase while the glue dries to make sure it lays flat against the ground.
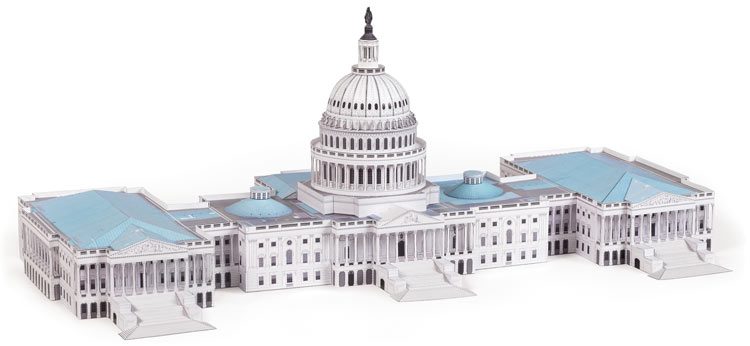
At last your U.S. Capitol model is finally finished. Now let's schedule a press conference to present it to your friends and neighbors! |
 Order the Capitol Building model book
 Order the Capitol Building model book