Postcard Scale Models
About the Cards
How To Build It
Tips & Techniques
Read More About It
Free Models
Order Cards
How to Build the Models

Coit Tower modelCoit Tower

Cut out the top level of the tower and roll into a cylinder. Press the paper against a round pencil or dowel to curl the piece into a cylinder and glue the tab inside.

After the piece is dry, glue it to the circular floor of the observation level.


Cut out the walls of the base. Fold the tabs down and fold the walls at right angles. Note that two folds at the front of the base are reverse (valley) folds which are scored on the back of the paper. Glue the ends of the walls together into a square base.

Next cut out the roof of the base and glue it to the top of the walls. Line up the corners of the walls with the corners of the roof.

Cut out the three rounded walls. Fold the ends of the walls at right angles and curl the center of the walls to match the curvature of the roof. Then glue the walls to the walls of the base, tucking the triangular tabs of the roof behind the curved walls.

Cut out and assemble the larger square pedestal and the smaller rectangular roof piece. Test the fit of each piece in place on the rooftop and trim the edge of the smaller rectangular piece if necessary so that it fits snugly between the front wall and the side of the pedestal.

Cut out the main section of the tower. Curl the paper against a round pencil or dowel and then glue to form a tapering cylinder.

After the glue is dry, insert the top section of the tower as indicated by the shaded lower half of the top section. Line up the arched windows on the top and bottom pieces and adjust to make sure the top piece is straight and level before the glue dries.
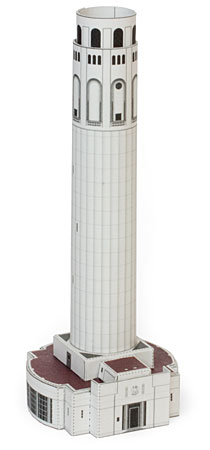
Finally, glue the tower to the center of the pedestal. Line up the seam of the tower at the back of the building, with the tiny slot windows on the sides of the tower matching the left and right sides of the base.

Now your Coit Tower model is finished!

Read more about Coit Tower