
Paper modelling is a simple and easily accessible hobby. All you need to get started are a few tools:
- Small scissors. Small craft or manicure scissors work best.
- Hobby knife. Put in a sharp new blade, such as X-acto #10 or #11 for best results.
- Sturdy tweezers. Tweezers with rough edges or teeth will mar the surface of the pieces, so find a set with smooth edges.
- Straightedge or ruler. Preferably a metal one, to guide your knife in making a straight cut or score.
- Toothpicks or blunt dental tools. For reaching into tiny corners and spreading drops of glue.
- Tacky glue. Elmer's white glue, Alene's tacky glue or PVA all work well.
- Cutting surface. You can use a self-healing cutting mat, but a piece of masonite or heavy cardboard will also work fine.
Basic tips for paper modelling:
 All the Build Your Own Chicago models use similar symbols to indicate how to cut out and construct the model. All the Build Your Own Chicago models use similar symbols to indicate how to cut out and construct the model.
Mountain folds (fold the sides back) are indicated with a dashed line (- - - - - - -)

Valley folds (fold the sides forward) are indicated with a dotted line (• • • • • • • •) or dash-dot line (• - • - • - • - •)

Cut out individual pieces along the black line around their edges. Some pieces may require cutting slots toward the center of the piece: look for a small scissors symbol or a fine white line indicating the length and width of the slot.
 Score the fold lines to make a crisp corner in a straight line. The smallest pieces especially should be scored before folding. Place a metal ruler along the fold line. You can use a dull point to compress the paper on the fold line, or you can use a new sharp blade to gently and evenly slice the top 1/3 of the paper. Score the fold lines to make a crisp corner in a straight line. The smallest pieces especially should be scored before folding. Place a metal ruler along the fold line. You can use a dull point to compress the paper on the fold line, or you can use a new sharp blade to gently and evenly slice the top 1/3 of the paper.

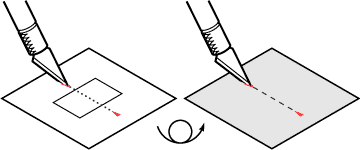
For valley (reverse) folds, score the back side of the paper. First, mark the ends of the fold lines by poking through the card with a pin or the tip of your knife. Flip the card over and connect the marks in order to score the fold line on the reverse side of the paper.
 Use glue sparingly on the tabs. To set the glue quickly, use a flat tweezer to squeeze the tabs together tightly once you have them in the right position and lock the glue in place. Use glue sparingly on the tabs. To set the glue quickly, use a flat tweezer to squeeze the tabs together tightly once you have them in the right position and lock the glue in place.
 Keep a chopstick or blunt toothpick ready to push small pieces into their correct positions while the glue is still tacky. Keep a chopstick or blunt toothpick ready to push small pieces into their correct positions while the glue is still tacky.

This technique is quite useful when pushing the roof pieces inside the small cylindrical sections of the Water Tower and 35 E. Wacker so that they are level and correctly inset from the top of the cylinder.
 If you feel that the Build Your Own Chicago models are just to small to assemble, try enlarging them on a color copier to a larger scale. Copy the artwork onto cardstock, or glue the copies to thick paper to make them stiffer. If you feel that the Build Your Own Chicago models are just to small to assemble, try enlarging them on a color copier to a larger scale. Copy the artwork onto cardstock, or glue the copies to thick paper to make them stiffer.
Advanced tips to improve your models:
 Some of the small pieces that need to be folded in half can be very difficult to manage, such as the flying buttresses of the Tribune Tower, or the rafter beams of Crown Hall. To make crisp folds on tiny pieces, first cut around the pieces as a group on one piece of paper. Some of the small pieces that need to be folded in half can be very difficult to manage, such as the flying buttresses of the Tribune Tower, or the rafter beams of Crown Hall. To make crisp folds on tiny pieces, first cut around the pieces as a group on one piece of paper.
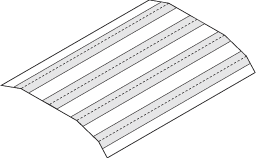
Score the folds and fold the pieces while they are attached to the larger piece of paper. Use a tweezer or flat edge of a ruler to fold carefully and evenly. Then flatten out the paper again and cut out the tiny pieces individually.
 Many of the models feature tiny details that are easily damaged when assembling the model. You can strengthen the paper with a drop of super glue (cyanoacrylate). Squeeze a small drop of super glue to the end of the nozzle and touch to the back or edge of the card. It will soak through the paper and dry the piece in its current shape. Be careful not to put the glue on the front as it may leave a glossy mark on the paper. Many of the models feature tiny details that are easily damaged when assembling the model. You can strengthen the paper with a drop of super glue (cyanoacrylate). Squeeze a small drop of super glue to the end of the nozzle and touch to the back or edge of the card. It will soak through the paper and dry the piece in its current shape. Be careful not to put the glue on the front as it may leave a glossy mark on the paper.

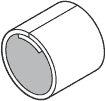
 Most paper cylinders are made with the tab glued underneath the edge of the seam: Most paper cylinders are made with the tab glued underneath the edge of the seam:
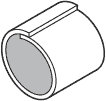
To make a smoother cylinder, cut off the tab before assembly. Glue a scrap of paper wider than the tab behind one edge, then match the two edges of the seam to make a smooth cylinder:
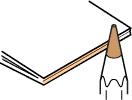
 Scoring the folds with a knife will make sharp corners for your model but it will also expose the light color inside of the paper. Use a colored pencil, such as a soft watercolor pencil, to color the inside of the fold before you assemble the piece. Do not use water color paints or markers on the Build Your Own Chicago models -- the matte paper will soak up the ink too quickly and stain beyond the fold lines of your model. Scoring the folds with a knife will make sharp corners for your model but it will also expose the light color inside of the paper. Use a colored pencil, such as a soft watercolor pencil, to color the inside of the fold before you assemble the piece. Do not use water color paints or markers on the Build Your Own Chicago models -- the matte paper will soak up the ink too quickly and stain beyond the fold lines of your model.
 When assembling tiny cupolas and domes without internal support, insert a small wad of tissue paper soaked with a drop of glue to give the rooftop sections something to attach to when folding in the flaps. When assembling tiny cupolas and domes without internal support, insert a small wad of tissue paper soaked with a drop of glue to give the rooftop sections something to attach to when folding in the flaps.

For many more helpful general instructions on paper modelling, see the tips and techniques sections of the Card Modelling FAQ and Paper Paradise. |
