Creating a Photorealistic Paper Model
Creating a photographic look on a paper model is a fun challenge and can create a unique paper sculpture. Just about anything you can photograph could be the subject, although an object with flat sides and a simple shape will be easiest to create.
The first things you'll need to do are to photograph your subject and measure its dimensions. Step far back from the object and use the telephoto to reduce distortion caused by wide-angle lenses. Try to get a photo of every side of the object, taken at a perpendicular angle to the sides of the object. For the roof of a house or the hood of a car you will need to find a high vantage point to photograph the surface face on.
While you are photographing, measure the dimensions of the object with a tape measure. Take note of the dimensions and heights of windows and doors or other details if possible, as these will be helpful for building an accurate skeleton diagram in the next step.
Create a skeleton diagram from your measurements in a vector drawing program such as Adobe Illustrator or equivalent. Choose a scale for the model and use a calculator to find the correct scale size of the model. Draw lines on the diagram to indicate the placement of doors and windows or other details.
From the wireframe skeleton, outline the pieces for a blank paper model of your object. Complete all pieces of the entire model, build a test mockup of it and make adjustments to get the fit of the model just right before proceeding to the next step.
![]()
Pasting the Photographs
To begin adding photographs to the blank model, choose one piece to work on at a time. A larger piece such as the wall shown above can be divided into several subsections, divided along seams of the subject, such as where a window meets a wall, or corner.
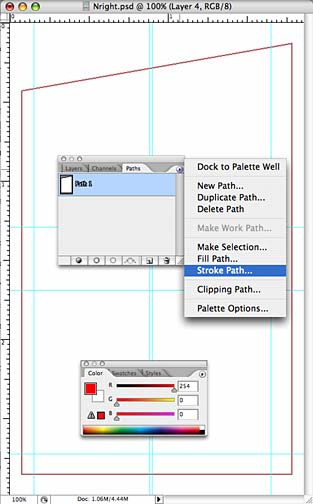
Going back to the vector drawing in Illustrator, select and copy a path outline of a subsection of the wall. Open a new Photoshop document at 300dpi and slightly larger than the outline. Paste the path into the Paths palette. You can copy and paste several paths at a time to include the outlined locations of windows and doors or other details from your wireframe diagram.
On a new layer, choose Stroke Path from the Paths flyout menu to draw an outline showing the shape that the photo will have to fit into to match the blank model piece.
Paste a photo onto another layer and scale it to the correct size, using the Free Transform tool.
![]()
Using the outlined path from the previous step as a guide and adding horizontal and vertical guides, you can see how much to stretch the photo to fit within the shape exactly. With some practice, you can select and stretch particular parts of the photo to straighten them out.
![]()
Distortion from the Lens
If your photos were taken close to the subject, they may appear to bulge outward by the natural distortion of the wide-angle lens. One crude method to straighten the "bulge" of these photos is to use the Pinch filter (Filter > Distort > Pinch) using a small amount between 2-5. Draw some guides before using the filter to test the correct result.
A better method is to use the Lens Correction filter (Filter > Distort > Lens Correction). Adjust the distortion slider on top and vertical and horizontal perspective sliders to straighten the photo to match the guide lines of the grid.

Using Parallax
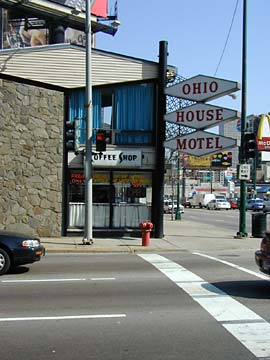
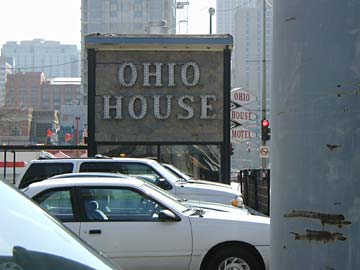
It may be difficult to get a clear view of all sides of your subject. Here a parked car and street sign are obscuring part of the wall of the building. But by stepping sideways a few feet to take a second photo, the sign is blocking a slightly different part of the wall.
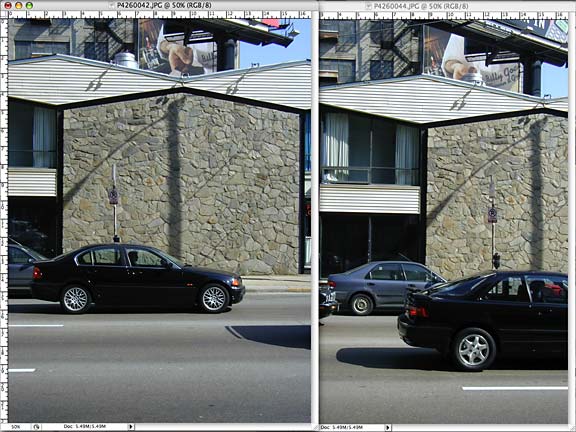
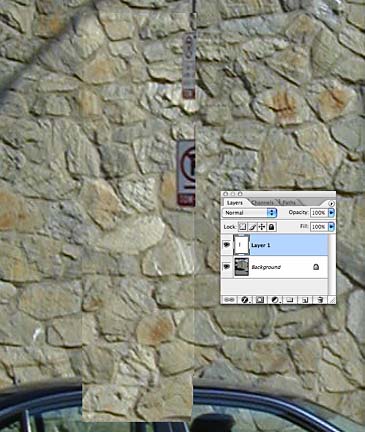
Copy the small section of wall visible in one photograph and paste the patch over the sign to make a complete wall. Adjust the hue and saturation if necessary to match the seams of the patch layer. The area hidden behind the parked car will require much more work to create a section of wall from scratch. If this rock wall were made from brick or other simple repeating pattern, it'd be a lot easier to fill in!
For other non-photographable areas of the model you may have to get creative to fill in the space. By collaging several photo angles together using the Free Transform tool, you can patch together images for every side of the object, even if its too difficult to get a clear straight-on photo.
Just remember that the beauty of a photorealistic model is in the fine detail and specific texture of the photograph. So even if you end up cloning large sections of wall to fill in blank areas, you should make every area of the photo look unique, natural and interesting. Every brick on a wall has a unique color and weathering, it is not just a repeated wallpaper pattern.

Assembling the Pieces
After you have collaged and stretched and distorted the photo to fit within its shape, you can use the same outline path to select just the parts of the photo within the path. From the Paths flyout menu, choose Make Selection from Path.

Copy and paste the selected area of the photo into a new blank Photoshop file, where you will assemble the completed subsections of the photo. You can use the eraser and paintbrush to hide the seams between subsections, if necessary, or adjust colors, to get the picture looking perfect.
Final Steps
When your Photoshop file is ready, go back to the plain white vector outline you made in the first step and place the artwork behind the blank outlines of the pieces. Because you used the same wireframe paths to trim the photos, they should fit exactly into the same sizes of the blank outlines. Perfect!
Download the finished Ohio House Motel
![]()
©2025 Matt Bergstrom